1. Introduction
Printed Circuit Boards (PCBs) are the backbone of modern electronics, providing the physical platform for mounting and interconnecting various electronic components. For high power components, efficient heat management is crucial, and this is where Metal Core Printed Circuit Boards (MCPCBs) come into play. In this blog post, we’ll explore the fabrication of 4-layer MCPCBs using aluminum and copper substrates, focusing on their effectiveness in rejecting heat.
2. Understanding Metal Core PCBs (MCPCBs)
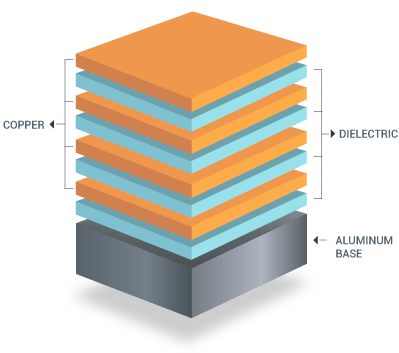
MCPCBs, also known as thermal PCBs or metal-backed PCBs, incorporate a metal core to enhance heat dissipation. This core acts as a thermal conductor, drawing heat away from critical components to prevent overheating. Aluminum and copper are the most commonly used metals in MCPCBs due to their excellent thermal properties.
3. Aluminum MCPCBs for 4-Layer Boards
Properties of Aluminum: Aluminum is known for its excellent thermal conductivity and lightweight nature. These properties make it a popular choice for MCPCBs in applications where heat dissipation is critical.
Advantages of Using Aluminum MCPCBs:
- Thermal Conductivity: Aluminum MCPCBs efficiently dissipate heat away from high power components, reducing the risk of overheating.
- Cost-Effectiveness: Aluminum is generally more affordable than copper, making it a cost-effective solution for many applications.
- Lightweight: Aluminum’s lightweight nature makes it ideal for applications where weight is a concern, such as in aerospace and portable devices.
Challenges:
- Manufacturing Complexity: Fabricating multi-layer MCPCBs with aluminum can be challenging due to its thermal expansion properties.
- Electrical Performance: Aluminum is not as conductive as copper, which can affect the overall electrical performance of the PCB.
4. Copper MCPCBs for 4-Layer Boards
Properties of Copper: Copper is renowned for its superior thermal and electrical conductivity. These characteristics make it an excellent choice for high power MCPCBs.
Advantages of Using Copper MCPCBs:
- Superior Thermal Conductivity: Copper MCPCBs provide unmatched thermal performance, efficiently managing heat dissipation.
- Electrical Performance: Copper’s high electrical conductivity ensures optimal performance of the PCB.
- Durability: Copper substrates are highly durable and resistant to corrosion, enhancing the longevity of the PCB.
Challenges:
- Cost: Copper is more expensive than aluminum, which can increase the overall cost of the MCPCB.
- Weight: Copper is heavier than aluminum, which may not be suitable for weight-sensitive applications.
5. Comparative Analysis: Aluminum vs Copper MCPCBs
Thermal Conductivity Comparison: Copper has a higher thermal conductivity than aluminum, making it more effective in heat dissipation. However, aluminum’s thermal performance is still significantly better than that of traditional FR4 substrates.
Electrical Performance Comparison: Copper’s superior electrical conductivity makes it the preferred choice for high-frequency and high-power applications, where electrical performance is crucial.
Cost and Manufacturing Complexity: Aluminum is more cost-effective and easier to work with compared to copper, which requires more complex manufacturing processes and higher material costs.
Weight and Durability: While aluminum is lighter, copper’s durability and corrosion resistance provide a longer-lasting solution for many high-stress environments.
6. Case Study: Heat Rejection in High Power Components
Consider a scenario where a high-power LED driver is used. The heat generated needs to be efficiently managed to ensure longevity and performance. In such cases, a copper MCPCB might be preferred due to its superior thermal and electrical performance, despite the higher cost. On the other hand, for applications where cost and weight are more critical, aluminum MCPCBs provide a balanced solution with adequate thermal management.
Real-World Applications:
- LED Lighting: Both aluminum and copper MCPCBs are used, with aluminum being more common due to its cost-effectiveness.
- Power Electronics: Copper MCPCBs are often used in high-end power supplies and converters.
- Automotive Industry: Both materials are used, depending on the specific thermal and weight requirements.
7. Conclusion
Choosing the right substrate material for a 4-layer MCPCB is crucial for efficient heat rejection, especially in high power applications. While copper MCPCBs offer superior thermal and electrical performance, aluminum MCPCBs provide a cost-effective and lightweight alternative. The decision ultimately depends on the specific requirements of the application, balancing factors such as thermal management, cost, weight, and durability. As technology advances, the development of new materials may offer even better solutions for managing heat in high power MCPCBs.
By understanding the strengths and limitations of aluminum and copper MCPCBs, engineers can make informed decisions to enhance the performance and reliability of their PCBs.